![]() Manual
Entry Screen
Manual
Entry Screen
You can Manually
Enter PAT Test results by clicking the Manual Entry Icon ![]() on the Tool Bar or selecting the "Manual
Entry " option from the "Files
Menu" which will bring up the screen shown below.
on the Tool Bar or selecting the "Manual
Entry " option from the "Files
Menu" which will bring up the screen shown below.
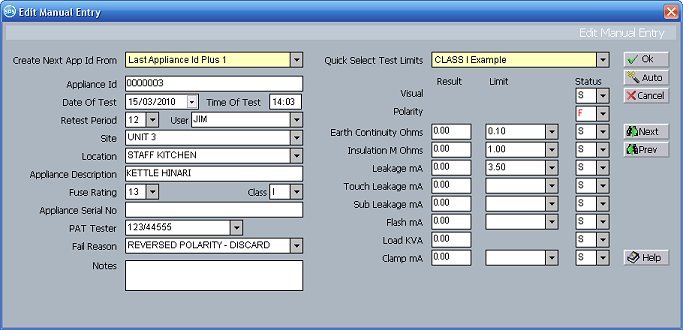
This option is specifically provided for the Manual Entry of test results where you have a PAT test machine from which you cannot download by using a serial cable or other means. For example the Fluke 5200 PAT Test Machine.
Use the Quick Select Test Limits drop down and the Auto button to speed up setting the test limits and the Pass / Fail status fields. See below for more information on how to do this.
There is no validation that the Test Limits and Results that you enter are consistent - it is up to you to ensure that the information you enter is correct. If you are using numeric appliance id's the Appliance Id will automatically be completed with the next number in the sequence.
If you are adding tests to an existing file that you have open, the Limit Drop down controls will contain the Limits that your PAT Tester provides. (Metrel and Seaward Testers Only) In addition if an existing file is loaded then the Site and Location drop down boxes will contain all the Sites and Locations used in the current file.
Metrel Beta Pat New Zealand and Australian Firmware
If you are using the New Zealand / Australian firmware version of the Metrel Beta PAT then you will see a second Earth Continuity result in place of the Flash test result.
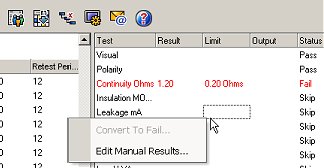
Editing Manually Entered Test Results
You can edit the Manually Entered test results by right mouse clicking on the Test Results area of the main data screen. A pop up menu appears with an option to edit the test data.
NOTE! This option is only available for test results that have been entered manually - you cannot use it to change the test data of results downloaded from a PAT Tester. The test code for Manually entered test results is set to the code "MANUAL" to signify they have not been downloaded from a PAT tester but rather input by you.
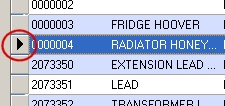
Double Clicking To Edit A Manually Entered Test
You can also Edit a manually entered test by Double Clicking on the Appliance in the Main SimplyPats screen. Again this option is only available to those tests that have been manually entered and have the test code "MANUAL". It is easier to click if you have the "Show Row Headers" option ticked in the "View Menu" (See Also The View Menu). You can then click on the traingle to the left of each test.
You can also edit a Manual Entry test by selecting "Edit Manual Entry" From the "Records Menu" or Quick Key Press CTRL + F6
Please Wait!
Once you have double clicked - wait for the Manual Entry screen to appear. There is alot of calculations and setting up of the manual entry screen and so it can take a few seconds to appear, depending on the speed of your computer.
Find Next And Find Previous
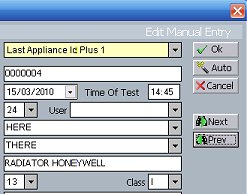
When you are editing a Manual Test you will notice that the screen title has changed to Edit Manual Entry, also instead of a New button, there is an OK button to save your changes. In addition two new buttons have appeared,
Next and
Prev. You can use these to buttons to Find the Next Manual test and Find the Previous Manual test.
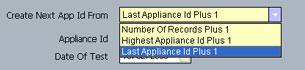
Create Next Appliance ID From
Clicking on the Create Next Appliance ID From drop down list, will present five options for calculating the next Appliance ID, these are:
NOTE! Each of the options for calculating the next Appliance Id give different results, and depend on whether you are using solely numeric appliance Id's e.g. 0001, 0002 etc, or whether you are using alphanumeric appliance Id's e.g. AP001, AP002 etc.
It is worth experimenting with the options before entering large amounts of data. We would recoment always using solely numeric appliance Id's (where possible) as you may find it gives you better sorted reports when you come to print them out.
Number of Records Plus 1
Looks at the number of Records in the current file and adds 1. If the file had 12 Records the next Appliance ID would be 0000013
Highest Appliance ID plus 1
Looks for the Record with the Highest Appliance ID in the current file and adds 1. If the highest Appliance ID is 0000020 the next Appliance ID would be 0000021.
Last Appliance ID plus 1
Looks at the Appliance ID of the last Appliance entered (Shown by TestNo) and adds 1. If the last Appliance entered had an Appliance ID of 0000050 the next Appliance ID would be 0000051.
Highest Alpha Numeric Appliance ID plus 1
Tries to calculate the highest Alpha Numeric Appliance ID (those with letters preceeding the number e.g. AP0004) by examing the numeric part of each Appliance Id and then adds 1. It tries to maintain the same length and format of the Maximum Alpha Numeric Appliance Id that it finds e.g AP0005. In the case of APC00054 the next appliance id calculated should be APC00055.
Note! In large Manual entry files, SimplyPats may take a while to calculate the new Highest Alpha Numeric Appliance Id as it has a lot of calculating to do!
Last Alpha Numeric Appliance ID plus 1
Tries to calculate the next Alpha Numeric Appliance ID (those with letters preceeding the number e.g. AP0004) by examing the numeric part of the last Appliance Id and then adds 1. It tries to maintain the same length and format of the Last Alpha Numeric Appliance Id that it finds e.g AP0005. In the case of APC00054 the next appliance id calculated should be APC00055.
Date and Time of Test
By default the Date and Time is set from the current Computer Date and Time, however either can be changed manually.
Time of Test Set to 00:00 Note, if you set a time of 00:00 you will be asked if you wish to set the time of all the subsequent tests that you manually enter to 00:00. This setting will be remembered as long as SimplyPats is running, however if your restart SimplyPats you will have to enter a time of 00:00 to reactivate this feature.
Site and Location
The Site and Location can be entered into the fields provided, once added they are available from the pull down menu for other Records that may be added, and are only available for the current file.
Retest Period
By default the Retest Period is set to 12 months. Clicking on the pull down menu will allow a different Retest Period to be chosen.
PAT Tester
The pull down menu allows you to choose which PAT Tester was used for the current test. The list of PAT Testers available is picked up from the Maintain PAT Testers Screen. Only the PAT Serial Number is displayed.
User / Engineer
You can use this drop down box to select which User performed the test. The users / engineers list is created from your currently open file to give a list of those engineers that have already carried out tests.
You can of course type the name of a new engineer if the current engineer doesn't appear in your drop down list.
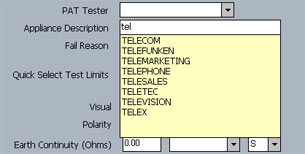
Entering Appliance Description using Predictive Text
Appliance Descriptions can be entered using several methods. Type the complete word or phrase into the Appliance Description Field, for example Television.
If you type the word Television, you will notice that as you type a list of words are displayed. These words are taken from the SimplyPats Dictionary.
As you type the list will change to display only those words containing the letters you enter, as shown in the screen shot below.
You can now use the Mouse and click on the word you want or use the up and down arrow keys to scroll through the list. Left clicking on the word or pressing enter on the keyboard will enter the word into the Appliance Description Field.
Any new words entered that are not in your Dictionary, will be available for the current session, or until you close SimplyPats. If you want words to be available permanently, you can add them to the Dictionary using the Maintain Dictionary screen available from Maintenance on the file menu.
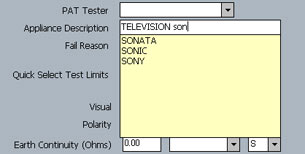
Entering Multiple words using Predictive Text
You can also string words together using predictive text. To do this press space after each word, when you start typing another word the predictive text will again start to list words from the text you enter, see screen shot below.
Entering Appliance Description using Abbreviations
You can also enter Appliance Descriptions using the Abbreviations feature. Typing in Ex6 for example will list EXT CABLE 6 WAY, shown in the screen shot below.
The full word or phrase of the Abbreviation entered will only be picked up if it exists in your Abbreviation List, please see Maintain Abbreviations for further information about managing Abbreviations.
Abbreviations are listed with a green background, while words from the Dictionary are listed with a yellow background.
Fail Reason
If the Appliance has Failed, you can choose to enter a Fail Reason from the pull down menu or enter your own. Fail Reasons can also be maintained using the Maintain Default Fails screen, this allows you to add your own commonly used fail reasons for quick selection using the pull down menu.
Notes
You can add any additional notes on the appliance in the Notes field. There is a maximum of 60 characters you can enter in this field.
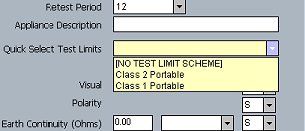
Quick Select Test Limits
Clicking on the Quick Select Test Limits drop down list will show a list of your predefined test limits for each of the electrical tests. Selecting a scheme will automatically populate the relevant test limits. See Maintain Manual Entry Test Limits for more information.
Entering Results, Test Limits and Status
Results, Test Limits and the Status of the test can all be entered individually, however a far quicker method would be to use the Quick Select Test Limits feature, add the test results and press Auto (See Below).
The Status of any failed tests are shown in Red.
![]() Add
Add
Adds the test to your file. NOTE that after adding a test, you will be prompted to clear the fields that you have entered. If you are adding several tests this will speed up the entry of the next test. This notification that the new test has been added will also missadvertently adding several of the same tests by mistake. A tick box option in the System Settings screen can be used to supress the prompting to clear your entries between adding each test which may help speed up manually adding your test results.
![]() Auto
Auto
Clicking on this button will automatically check the test result against the test limit for each test and decide whether the status should be a Pass, Fail or Skip. In addition it will set the Visual Test by default to a Pass.
If your appliance description contains the word "LEAD" ie it was an extension or IEC lead test then the Polarity test will be set by default to a Pass.
You can change the word that is searched for in the appliance description from LEAD to a word of your choice e.g. CABLE in the SimplyPats System Settings screen
Close the Manual Entry screen screen.
![]() Find Next (Only Available when you are editing a Manual Test)
Find Next (Only Available when you are editing a Manual Test)
Finds and Displays the Next Manual Test in your file.
NOTE! This button is only available when you are editing a Manual Test and doesn't appear if you are creating a new manual test.
![]() Find Previous Manual Test (Only Available when you are
editing a Manual Test)
Find Previous Manual Test (Only Available when you are
editing a Manual Test)
Finds and Displays the Previous Manual Test in your file.
NOTE! This button is only available when you are editing a Manual Test and doesn't appear if you are creating a new manual test.
See Also Maintain Manual Entry Test Limits
(This Topic Last updated 02/12/2011)