![]() System
Settings
System
Settings
The System Settings screen allows you to make various changes to the way the SimplyPats program behaves, where for example your default folder for storing your data is. You should make sure you have set the reviewed these program options and made any changes where necessary.
Choose the "System Settings" option from the "Settings" Menu (Quick Key Press CTRL+K).
Pat Settings TAB
This tab is left in SimplyPats to aid previous users to find the download settings for thier PAT tester. Every time you download your PAT Tester you are presented with the options that used to be on this screen. See Also The PAT Settings Screen
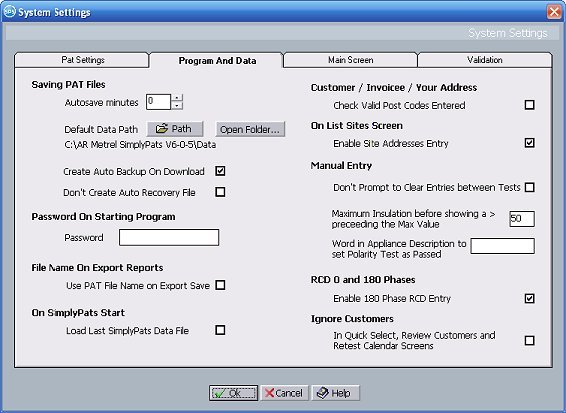
Program And Data TAB
Autosave
If you enter a figure in this field, you will be prompted every so many minutes to save your work. If you leave the field as 0 then the autosave prompting will be disabled.
Default Data Path
This button will allow you to set the default data path where your data files are looked for when you select File Open or File Save from the Main Menu. It is also the folder which is searched when you select "Review Customers" or "Retests Calendar" from the Customers Menu. This option is usefull if you are storing your SimplyPats files on a Networked File Server so that they are accessible by several users on the Network.
Create Auto Backup On Download
Ticking this box will automatically create a backup file when you download from your PAT. A file with the date and time of when you downloaded, with a .BAK extension will be created in your backup folder. This backup folder will usually be c:\Program Files\SimplyPats 6\Backup
If for any reason the data file you work on becomes corrupted or deleted, you will have a safe backup of the original file that you can use to recover your information. NOTE: We recommend you always make a backup when you download.
Don't Create Auto Recovery File
By default, SimplyPats Version 6 will create a backup of your current data every 15 minutes. If you tick this Don't Create Auto Recovery File option then no automatic backups will be made.
The automatic backup files are saved in the c:\Program Files\SimplyPats 6\Backup folder and are given the same name as your current file with a filename extension of .rec
Simply rename the .rec file to .pat and they can be loaded back into SimplyPats.
This disaster recovery feature is designed to backup your file in case your computer crashes, you electricity fails, or you have made serious changes to your data and have accidentily saved the changes. Using this feature you can recover your original data whilst only loosing a maximum of 15 minutes work.
Password
If you enter a password in this field, you will be prompted to enter this password when you next start SimplyPats and thereafter. This is a way of protecting your program from unauthorised access. See Also Enter Password
*** IMPORTANT ***
Make sure you make a note of your password once you enter it as you will not be able to get into the program again without it!
Use PAT File Name On Export Save
When ticked, the name of any exported Reports will be taken from the current SimplyPats file name. If the current SimplyPats data file is called mypatfile.pat and you exported a Pass and Fail Report in PDF format via the Print Results screen, then the exported Report file name will be mypatfile.pdf
On SimpyPats Start
When the Load Last SimplyPats Data file option is ticked, SimplyPats will automatically load the last data file you worked on when starting SimplyPats next time.
Customer / Invoicee / Your Address
Check Valid Post Codes Entered. If you tick this option all post codes entered in the Customer Address, Invoicee Address or Your Company Address will be checked for validity. Note this will only check UK post codes. If you don't wish SimplyPats to do any checking of the post codes you enter, enusre the tick is removed from this option.
On List Sites Screen
Enable Site Address Entry
If you tick this box, when using the List Sites Screen from the Records Menu, an area will be activated where you can enter full site addresses. These addresses will appear in the V2 Multi Site Passes and Fails Report.
Manual Entry
Dont prompt to clear entries between tests.
When Manually adding tests in the Manual Entry screen, if this option is ticked the message asking if you want to clear entries before adding a new test will not be shown.
Maximum Insulation Value before showing a > preceeding the maximum value
If you enter a value in this box e.g.100, when entering an Insulation value for a Manually entered appliance, if the Insulation value is greater than 100 then on the Main screen and your reports the result will be shown as >100.
This is a way os setting the maximum possible insulation result for a Manual PAT tester.
Word in Appliance Description to set Polarity Test as Passed
When manually entering a test, if you include the word entered here into the appliance description and press the Auto Set feature on the manual entry screen, the Polarity Test will be set to Passed.
If this box is left blank, entering the word LEAD on the appliance description and pressing AutoSet will mark the appliance as passed.
RCD 0 and 180 Phases
If you select the Enable 180 Phase RCD entry tick box, when manually entering an RCD test you will be able to enter trip times for both the 0 and 180 phases.
Ignore Customers
In the customer Quick Select Screen. Review Customers, and Retest Calendar Screens, any customers that you have set to be ignored will not be displayed. Take the tick out of this box if you want to see all of the customers, even if you have previously set to ignore them.
Main Screen TAB
Restore Default Main Screen Column Settings
Clicking on this button will reset the column width and position settings in the Main Data screen to their default settings.
Note! SimplyPats will prompt you to exit for the changes to take effect.
Main Screen Grid Odd Even Colours
Clicking on this Odd Row or Even Row buttons allows you to set colours for the alternate lines of data on the main screen. These colours help you to read across the lines of data more easily. You will have to go to the View Menu and select Show Odd / Even colour to see the changes.
Show Failed Tests In Red
As you review your tests, any failed tests will appear in red, allowing you to spot them more easily.
In Results Area - Hide Skipped Tests
If you tick the Hide Skipped Tests box then any tests which havent been performed will not be shown in the Results Area at the top right of the Main Screen.
Font Size On Main Screen
From the drop down list you can select the font size to use for the grids of information on the SimpyPats Main Screen. This can be useful if you are using a high resolution monitor and are having difficulty reading small text.
Drag And Drop Settings
Enable Drag and Drop
To Enable Drag and Drop, make sure that the tick box is ticked. If you find when selecting records or navigating on the main grid you persistently see a No Entry mouse pointer, you may want to disable the Drag and Drop by clearing the tick box until those times you need to use it.
Include The Following
Below this are various options related to drag and drop. This function allows you to select various appliances (See Selecting Multipls Appliances) and drag their information to another drag and drop enabled program e.g. Microsoft Excel (tm) or Microsoft Word (tm).
The various option are described in detail on the following page Drag And Drop
Show Columns
The list shows what columns of data are possible on the main screen. To ensure a column is visible make sure it is ticked. To hide a column from the main grid, remove the tick. The Tick All button will reset all the columns making them visible on the main screen. Any changes you make won't be shown until you click the Ok button. Click the Cancel button to cancel any changes you have made to the list.
Validation TAB
On Test Validation Check For
Ticking these boxes will turn on or off these conditions when you validate your file. If you are not using the comments fields to store Charge and Repair Codes and Retest Periods, we suggest you untick these boxes.
![]() Ok
Ok
The Ok button closes the System Settings screen and saves any changes that you have made.
![]() Cancel
Cancel
(Last Updated 29/08/2012)Closes the System Settings screen but abandons any changes that you have made.