This screen allows you to change the settings for your test results printed reports. From the "Settings" Menu, select the "Print Settings" option (Quick Key Press CTRL+U)
The settings are divided into various TABs - Click on the links below to see just those settings on a particular TAB.
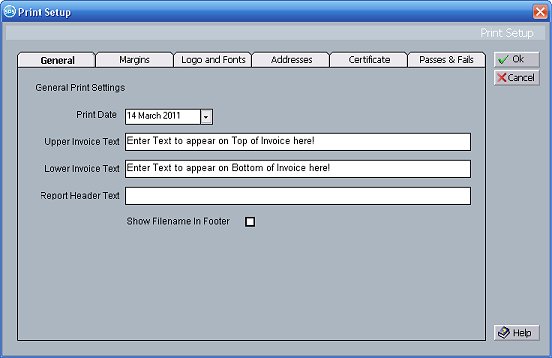
General
Margins
Logo and Fonts
Addresses
Certificate
Passes and Fails
Print Date
The Appliance Register, Fail and Passes, Testing Certificate and Current Appliance Report have the date they were printed on the header. By default the date set will be today's date, however, you can change the date that appears in this Print Date field.
Upper Invoice Text
This is text that will be printed out at the top of your Invoice. You may want to include your Payement Terms in this box.
For example, if you include the following
PLEASE NOTE! Invoices must be paid by [duedate30] at the latest!
would be replaced on the print out by
PLEASE NOTE! Invoices must be paid by 20/08/2011 at the latest!
The date shown being calculated 30 days after the invoice was raised. (You could obviously enter [duedate45] etc )
It is essential that the duedate phrase is entered exactly with the square brackets and only from 01 days to 99 days.
Lower Invoice Text
This is text that will be printed out at the bottom of your Invoice. You may want to include some promotional information in this box.
Report Header Text
This is text that will be printed out just below your addresses and logo at the top of the following Test result reports: Passes, Fails, Passes and Fails, Appliance Register, Appliance Register By Group, Current Appliance, One Appliance per Page, Retests grouped By Date and Simpyfied Passes and Fails.
This text maybe used to display for example your ISO9001 Registration, or the PAT tester Serial Numbers used in the testing.
The red arrow below shows where the extra header text will appear. NOTE. The arrow won't appear on your reports!
Show Filename In Footer
If you tick this option then the Filename of the current file will be shown in the footer when printing the Passes, Fails, Passes and Fails, Appliance Register, Appliance Register Grouped By Site, and Retests Reports.
Top / Left / Bottom Margins
You can set the margins you wish to have on your print outs using these fields. If you print the Test Certifcate these settings are ignored because the Certificate is a full sheet of A4 paper.
You can set the top margin to take account of any pre printed headed paper you might want to use.
Display Logo / Logo Height
If you tick the Display Logo box, then your company Logo will appear on the printouts between Your Address and the Customer's Address. Logo height will determine what size the logo is. You can change your logo in the "Your Settings" screen from the "Settings" menu. See Also Settinngs Up Your Company Information
The maximum size you can set your logo to is 40mm.
Font Properties
You can change the font and its characteristics (Bold, Italic etc) using this button. Remember though, although the characteristics of the font are changeable on the Fails and Passes printouts, you cannot increase the font size of the Print Results - since they would not fit on a page.
In Cusomers' Address Show
Contact Name, Order Number, Email. By selecting or clearing these options you can decide whether to have these details of your customers address printed on the header of the print outs.
Show Customer Mobile Number, Show Customer Fax Number. Selecting either of these options will govern what is displayed on the Customer Details screen and Calendar extra information screen. Most people want to store Mobile Phone numbers for their customers rather than their fax numbers. You can of course store their fax number in the extra notes field on the Customer Details screen.
In your Address Show
Phone Number, Fax / Mobile Number, Email Address, Web Site. By selecting or clearing these options you can decide whether to have these details of your address printed on the header of the print outs.
Show Your Mobile Number, Show Your Fax Number. Selecting either of these options will govern what is displayed on the Your Details screen and on your reports. Most people want to show their Mobile Phone number rather than their fax number.
Certificate Prefix
The text that you enter in this box will be shown preceeding the Certificate Number (see below) on your certificate. The unique certificate number and prefix will only be shown where the certificate number is greater than 0. If you wish to display certificate numbers on your certificate, first set the number to 1 or your desired starting number.
Certificate Number
The next unique certificate number to be displayed on your certificate report. Setting this number to zero will result in no certificate number and prefix being displayed.
Certificate Text
The text that you enter in this box will be shown on your printed Certificate. Please see Printing a Certificate for further information regarding this.
Certificate Retest Date Show Only Month and Year
If you tick this box, on your Certificate of Testing Report, the next due Retest Date will be shown as only a Month and Year and not a specific date. For example the next retest date may be the 4th of August 2009, however ticking this box will then show the Retest Date as August 2009.
In the Fail Report: Show Fail Reasons
Tick this box if you want to print out the Fail Reasons you have entered against a failed appliance. Fail Reasons are only printed on the Fail Report and the combined Pass and Fail Report.
In the Fail Report: Show Fails In Red
Tick this box if you want the failed appliances to be printed in Red. This will only occur on the Fail Report , the combined Pass and Fail Report and Print Current Appliance. (Obviously you must print to a colour printer for this option to work!)
In Passes And Fails Report: Show Notes
If you tick this box, the Extra Notes that you have added about an appliance will be shown the Passes, Fails and Passes And Fails Reports. The Extra Notes text is shown below the Fail Reason text if that has been also selected to display (see above) and of course you have entered a Fail Reason for the Failed Appliance.
In Leakage results Don't show <0.1 if value less than 0.1
Allows the showing of exact test results for Leakage, Sub Leakage, Touch Leakage, Flash and Clamp tests. If this box is not ticked, if test result was less than 0.1 then SimplyPats shows and prints <0.1 with the less than sign. If the box is ticked, no less than sign is shown and the exact value e.g. 0.02 is shown and printed.
In the Current Appliance and Single Appliance Per Page Reports: Print Page In Red
Tick this box if you want the Current Appliance and Single Appliance Per Page Reports to be Printed in red when they are a failed test. (Again you must print to a colour printer for this option to work!)
![]() Ok
Ok
Saves the changes that you have made and closes the Print Setup screen.
![]() Cancel
Cancel
Abandons any changes you have made and closes the Print Setup screen.
(This Topic Last updated 01/08/2011)