![]() Edit
Print Sequence
Edit
Print Sequence
From the Print
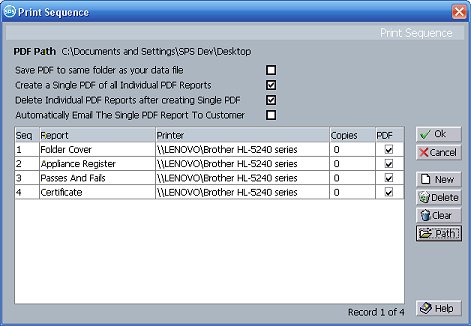
Results screen clicking on the ![]() Edit Print Sequence button brings up the folowing screen.
Edit Print Sequence button brings up the folowing screen.
On this screen you can set up a sequence of reports to be printed. All of these reports can then be printed in turn by simply clicking on one button.
To add a new entry to your sequence click on the New button. You can then specify how many copies of the report are to be printed, to which printer you want them printed, and additionally whether you wish a Adobe Acrobat (tm) PDF document to be created.
If PDF files are being made they will all be saved to the folder that you specify using the Path button. The current path is dsiplayed at the top of the screen. Alternatively if you want your PDFs to be saved to the same folder as your loaded data file then click on the Save PDF to same folder as your data file tickbox.
As you can select which printer you wish each of your print outs to be printed to, it is import that any network printers are switched on and also no one has renamed the printer driver.
Tip - Using a Printer with Muliple Bins or Trays
If you have a printer with several printer bins where you can stock different kinds of paper, you can make SimplyPats use different source bins for different types of report by copying the printer and setting its default bin. If you don't know how to do this, ring our technical support team and we will go through it with you.
Creating and emailing PDF Reports
If you want to only create a PDF or individual PDFs of your reports, set the number of printed copies to 0. When copies are set to 0, no physical printing will occur, only the PDFs. Of course remember to set the tick box in the PDF column of the reports you want to be created as PDF.
There are 4 additional options at the top of the Print Sequence screen that allow you to create a Single PDF containing all your Adobe Acrobat (tm) PDF documents in one single file.
Save PDF to same folder as your data file
If you tick this box then the single PDF containing all your individual PDF reports will be saved in the same folder as the SimplyPats data file that you have loaded. If you want to save your PDFs to a set folder (e.g. My Documents) click on the path button (see below).
Create a Single PDF of all Individual PDF Reports
Tick this box if you want to create a single PDF containing all your individual PDF reports
Delete Individual PDF Reports after creating Single PDF
If you tick this box then the individual PDF reports used to create the Single Pat Testing report will be deleted following the creation of the Single Report.
Automatically Email the Single PDF Report To Customer
If you tick this box then after the single PDF report has been created it will automatically be attached to an email ready to send to your customer. NOTE. You should ensure you have set an email address for your customer for this function to work.
NOTE! Temporarily excluding a report from being printed or having a PDF made
If you remove the tick from the Create PDF column and set the number of Printed copies to 0, when you save your print sequence you will be warned that this report will be excluded from the sequence.
![]() Ok
Ok
Closes the Edit Print Sequence and saves your sequence. The entries you have made will be check to make sure you haven't made any errors.
![]() Cancel
Cancel
Closes the Edit Print Sequence and discards the changes you have made.
![]() New
New
Adds a new entry to your sequence. You can then set which report is to be printed, how many copies are to be printed and whether you wish a PDF file to be created at the same time.
![]() Delete
Delete
Delets an entry from your sequence.
![]() Clear
Clear
Clears all the entries from your sequence allowing you to start from scratch.
![]() Path
Path
This button prompts you to select the folder where you wish your PDF's that are created to be saved. When each PDF is made it will be saved to this folder. You must use the tick box against each report to specify that you want a PDF of the report to be made. If you tick the Save PDF to same folder as your data file tickbox then your PDFs will be saved to the same folder as your loaded data file.
(This Topic Last updated 11/04/2011)