Print Labels
The Print Labels screen is accessable from the "Print PAT Labels" option from the "Tools Menu"
NOTE! this feature will not print the label in its entirety, you will need to purchase the necessary label stock supported by the SimplyPats software. SimplyPats will only overprint information such as BAR Code, Company Name and Test Date etc. If the stock you would like to use is not supported, please contact us to see if it can be added.
![]() Print Labels from an existing data file
Print Labels from an existing data file
Load the file that contains the appliances that you want to print labels for.
If you would like to print labels for all the appliances in the current file, simply Right Click on one of the appliances listed in the Main Screen and choose Select All Records, on the File Menu click Tools and choose Print PAT Labels, you should now see the Print Labels screen.
The data contained within the existing file will then be printed onto the label. The type of Data included on the printed label will depend on the label template chosen and the stock you are using.
![]() Printing Labels without a data file loaded / Auto Generation of Appliance Id's
Printing Labels without a data file loaded / Auto Generation of Appliance Id's
If you would like to generate new labels with consecutive Appliance ID’s, simply close the existing file if you have one open, on the File Menu click Tools and choose Print PAT Labels, you should now see the Print Labels screen.
The type of Data included on the printed label will depend on the label template chosen and the stock you are using.
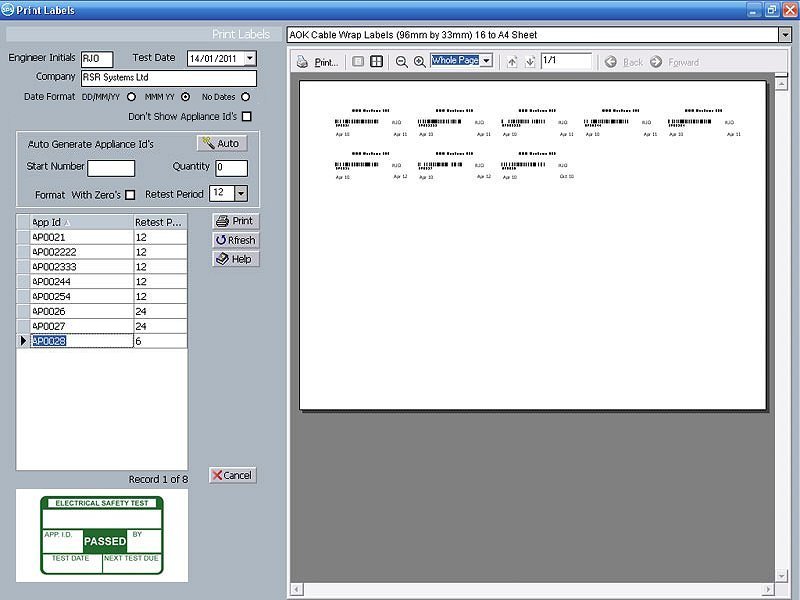
![]() Print Labels Screen
Print Labels Screen
The Print Label Screen presents you with various options as well as displaying the information that will be printed on your chosen label.
Label Chooser
Use the Drop Down Menu situated above the Print Preview area to choose the Label Stock you want to print onto.
Please check that your labels are supported before continuing to print your labels.Print Preview, Label List and Label Stock Preview
Please note that there may be what seems to be a period of inactivity on the Print Labels screen if generating a large number of labels, if this is the case an animated Working icon will be displayed in the top right of the screen.
The Print Preview on the right of the screen shows you what will be printed onto your chosen label. Zoom and paging options are available so you can preview the information in more detail before committing to printing your labels.
The Label List displays the Appliance ID and Retest Period of every label to be printed. The label at the top of the list will be the first label printed. The sort order can be reversed by clicking on the App Id header, handy if you are printing onto Roll Labels and want to print the last label first with the intention of re-rolling the labels.
The Label Stock Preview in the bottom left of the screen shows a graphical representation of the Label Stock chosen.
Engineer Initials
If printing labels from an existing file, the Engineer Initials are automatically entered. If the file contains a full name for the engineer, the full name will be converted to initials. The initials used on all labels for the selected appliances will be the first initials (or Engineer Name) found in the file or selection.
This field is editable to a maximum of three characters.
Test Date
If printing labels from and existing file, the Test Date is automatically entered based on the Retest Date for each appliance. If the Test Date is changed from the Print Labels screen, the Test Date will be updated on all labels.
If you are creating new labels, the Test Date will be today's date, this is however editable.Company
This is your Company Name, this is taken from the Company Name entered into the Company Name field under the "Settings" menu, "Your Settings ". The Company Name can be edited under the Print labels screen.
Date Format
The date printed on the label can be shown in one of three formats:
DD/MM/YY
Shows the Test Date and Retest Date in the format DD/MM/YY for example 01/11/10
MMM YY
Shows the Test Date and Retest Date in the format MMM YY for example Nov 10
No Dates
Doesn't print either Test Date or Retest Date on the labels. The No Dates option then No Test Date or Re Test Date will be printed on your labels. This option might be useful if you want to hand write the Test Date and Retest Date on your labels whilst doing the testing.
Don't Show Appliance Id's
If you tick this box and then click the Refresh button, no appliance id's will be printed on your labels. This may be handy for Engineers that want to print pat testing labels with just their company name, but want to fill in the rest of the information by hand when out in the field testing.
Refresh
If you make any changes to the Engineer initial, Test Date, Company or Date Format, press Refresh to update those changes.
Auto Generate Appliance Id's
This area is any used where you want to create labels that are not generated from an existing data file, i.e. Create new labels. Consecutive Numbers will be printed based on the Start Number entered.
Start Number
Enter the number you would like to appear on the first label.
Quantity
Enter the quantity of labels you would like to print.
Format with Zero's
Ticking this option will add zero's to the number printed, to a maximum of seven digits. If your Start Number was 1 and you ticked the Format With Zero's option, the number printed on the label would be 000001.
Retest Period
Enter the Retest Period in Months. The Retest Period is used to calculate the Retest Date. This is done by adding the Retest Period to the Test Date. The Test Date for Auto Generated Appliance Id's is set to today's date by default.
Auto
Pressing the Auto Button will generate the labels based on the information you entered.
Press the Print Button to start printing your labels.
Cancel
Press the Cancel button to close the Print Labels screen.
Downloadable Label Templates
Free as well as Paid Label Templates are available from our website
(This Topic Last updated 13/01/2011)